Today’s entry in Reclaim Hosting’s #DocumentationDecember brings you a guide on how to set up and manage your addon domains! We’ll go over what an addon domain is, why it might make sense for you, and we’ll walk you through how to get an addon domain activated on your Reclaim Hosting account.
What is an addon domain?
In our documentation on how to set up and manage your subdomains, we make the analogy that owning a domain is sort of like having a piece of “territory” on the web, like a tract of “web land.” Using a subdomain (like docs.www.reclaimhosting.com or domains.www.reclaimhosting.com) is a great way to develop your land and put different kinds of property on it, but if you want more land for an entirely different purpose, an addon domain might be a better choice for you. Eventually if you have enough domains you can start building houses on them, and then if you have enough houses you can build a hotel.
Obtaining an addon domain
You can buy a new domain name directly from us through your client portal, or you can transfer a domain you have from another registrar to your Reclaim Hosting account. For this post, we’ll go over how to set up a new domain (purchased from us) first, and go over how to transfer in a domain from another registrar at the end.
Setting up your new domain
You don’t need a new Reclaim Hosting account to get another domain, and you can manage all of your domains from the same account portal. For example, let’s say you have an awesome blog that you’ve been posting to for 10 years, and you want to ride the success of your blog to new heights by opening Javatuesdays, a gourmet espresso shop. You decide you’d like to buy javatuesdays.com to commemorate the grand opening of your new shop.
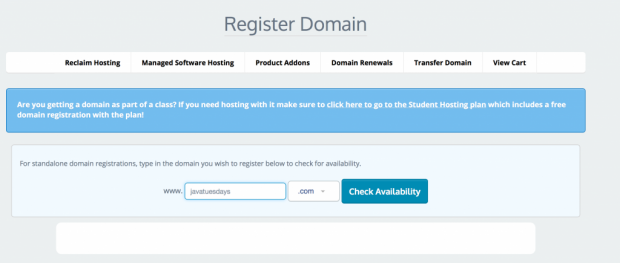
To start, log-on to your Reclaim Hosting account, hover over “Domains,” and click “Register a New Domain.”
In this screen, simply type in the domain that you’d like to register and select a suffix (.com, .net, .org, etc) – our system will confirm that the domain is available (or not); in our case, javatuesdays.com is available, so I’ll click “continue.”
The next screen will give you a couple of options. The first option is to purchase identity protection for your domain at a cost of $7.00. ICANN (basically the governing body of the Internet) requires you to identify yourself when you register a domain with your name, address, email, etc. Without identity protection, another Internet user can use a tool called whois to look up your information and contact you personally about products or services. Identity protection masks this information on your behalf, and if there is an issue with your domain, ICANN will contact the registrar (that’s us) and we will contact you on behalf of ICANN. Personally, I recommend the identity protection unless you are registering a domain for an Internet business and want your personally identifiable information to be “easily found.”
The second option asks if you’d like to change the nameservers for your domain. If you are hosting your website through Reclaim Hosting, you do not need to change these settings. You would only want to change your nameservers if you were hosting your website with another provider (like Squarespace) but wanted to keep your domain registered with Reclaim.
In our example, we’re hosting javatuesdays.com with Reclaim Hosting, and opted to purchase the Identity Protection. After clicking “Continue,” you can review your order and check out by putting your credit card information in the bottom right under “Payment Method.” When you’re all set, click the “Complete Order” button on the bottom. When your order is complete, you will see a link to return to your client area.
Starting up a site for your addon domain
As mentioned earlier, you don’t need a new hosting account for your new domain! Once you’re back in the Client Area, click on cpanel, and then click “addon domains.”
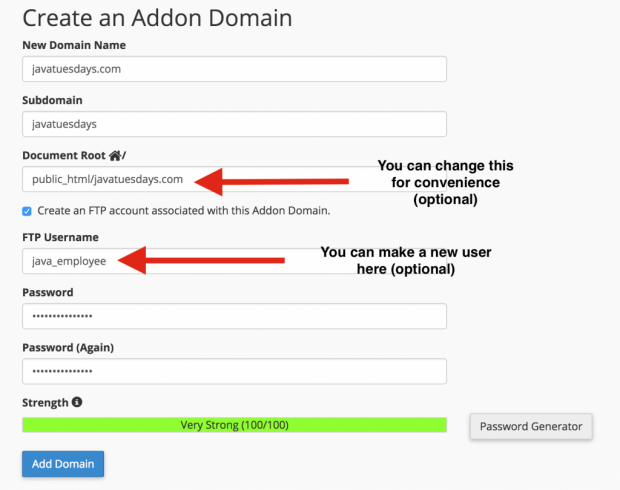
In “addon domains,” fill in the “new domain name” field with the domain you just registered; the “subdomain” and “Document Root” fields will populate automatically. In our case, I am going to remove the “.com” from my “Document Root” folder, but that is only for my convenience, you do not need to do this.
You also have the option of creating a new FTP account that has access to the content on your domain. You also do not need to do this, but you may want to if you’d like to give someone else FTP access to your site, so I am going to go ahead and set that up. Your existing FTP credentials will allow you to get access to all of your Reclaim sites, and a refresher on how to use FTP can be found here.
Once you’re done setting up your domain options, click “Continue” and wait a few seconds for your changes to process. That’s pretty much it!
Installing applications on your new domain
Once your domain is set-up, back in cpanel, you can select a featured application and install it to your new domain. For javatuesdays.com, I’d like to install WordPress, so I’ll click “WordPress” and then click “Install this application.”
On the install page, click on the drop-down menu at the top and select your new domain, then enjoy your new site!
Transferring a domain from another registrar
Transferring a domain you already own is not too much different from registering a new domain, except the transfer process requires an EPP code, which is basically an agreement code obtained from your registrar that allows the registrar to release your domain. Basically, to start the process, click on “domains” in the client portal, but instead of clicking “register a new domain,” click “transfer domains to us.” You will be prompted to enter your EPP code on the same screen where we ask if you’d like to buy the identity protection. The process is pretty standard across registrars, but there are a couple of “gotchas” (these are the rules set by ICANN) to be aware of no matter what, and it’s worth noting that these rules also apply if you would like to transfer out of Reclaim Hosting (but we know it won’t come to that!):
- If you have whois protection enabled through your registrar, you must disable it (temporarily) before you initiate the transfer. This is because we will send a confirmation of authorization email to the email address on your domain that you provided to the original registrar. (think of it like a “are you really sure you want to transfer? message)
- You must click the confirmation link in the email we send, or you will have to start the process over!
- Your domain must not be less than 60 days old, and you must not have previously transferred your domain in the last 60 days.
- The domain transfer process can take up to 5 days.
Here are the transfer/EPP code instructions for some popular registrars:
Namecheap (they provide some of the most comprehensive info on this process, if you’re interested)
If your domain registrar doesn’t appear here, you can do a Google search for “epp code” and then the name of your registrar, and remember, if it’s helpful to you, it’s probably helpful for others, so send us a support note and we’ll feature your suggestion here!
We will confirm once your domain is transferred, and then you can follow the same directions (starting with cpanel) to set it up as an addon domain. Happy Reclaiming!


